
I keep the interior of my Rivian R1S very clean, as I use it for both daily errands and long weekend trips. While installing car mats may seem simple, I’ve found that the right size, placement, and installation of the mats are actually very important. A well-fitted mat won’t slip, wrinkle, or interfere with the brake-accelerator. I do this step-by-step myself to make sure everything fits properly.
1. What type of mat is best for the Rivian R1S 2026?
There are different types of 2026 Rivian R1S Floor Mats available. Which one you choose depends on how you use the car.
Original or factory mats: These fit exactly to the shape of the car’s floor. They’re good for driving on normal roads.
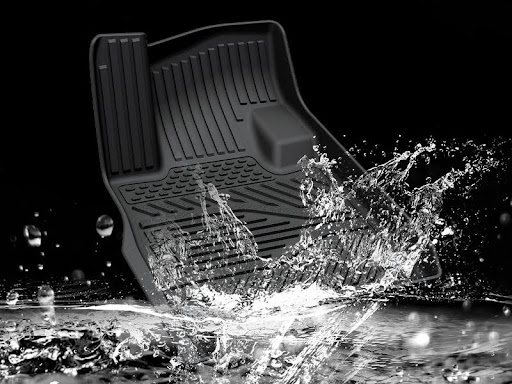
Heavy-duty or all-weather mats: If you spend a lot of time outside, have kids or pets, or are exposed to mud and water — these mats are more useful. They can withstand dust, sand, snow, and keep the interior floor dry. I use these mats when I walk a lot in the field.
Third-party custom mats: There are also mats from other companies on the market. When I get them, I look for two things: Are the edges of the mat even, or are they raised or lowered? And does the mat emit any kind of strong odor? A good custom mat will fit perfectly to the floor of the car on its own, without having to be forced into place.
2. What you need and how to prepare
No special tools are needed to install the mats. I usually keep the following things: a small vacuum cleaner or brush, a slightly damp cloth.
Before installing the new Rivian R1S Car Mats, take out the old ones. It is unsafe to put two layers of mats together, as it increases the risk of the mat slipping.
After removing the old mat, clean the floor quickly. The mat should sit properly on a level and clean floor. Also check the anchor points or rings on the driver’s side mat, so that the mat does not slip later.
3. Step-by-step rules for installing the mats
Step 1: Remove the old mats
This part is easy, but be careful not to break the clips or rings. Some mats come off by pulling straight up, while others require a slight twist or twist. After removing the mats, only one layer should be left on the floor.
Step 2: Clean the floor thoroughly
Vacuum in the corners where dust accumulates. Then wipe with a slightly damp cloth. Let the floor dry completely before installing the mats, otherwise moisture will be trapped underneath.
Step 3: Install the driver’s side mat
This is the part where you need to be most careful, as it houses the brake-accelerator pedals. Place the mat on the floor and slowly move it forward until it aligns with the edge of the footwell. Then secure it to the Anchor Points. After installation, press the brake and accelerator pedals once to make sure that the mat is not obstructing anything.
Step 4: Install the passenger side mat
The passenger side usually does not have Anchor Points. So, install the mat according to the size and edge of the footwell. Check whether the mat is evenly under the seat rail, and whether it is wrinkling. If it moves too much, then reinstall it.
Step 5: Install the second-row mat
The second-row mat can be a single piece or a separate piece. Tuck the front of the mat lightly under the seat. Make sure the mat doesn’t come up when you move the seat back and forth. This will prevent the mat from wrinkling and collecting dirt underneath.
Step 6: Install the third-row mat (if available)
The third-row mat usually wraps around the folded seat. Make sure the seat folds and unfolds easily after installing the mat. Fold and unfold the seat a few times to test it.
Step 7: Install the trunk or cargo area mat
The R1S has two levels of storage in the trunk. So, install the mat in such a way that the mat remains level and stable with the storage cover open or closed. If any part of the mat wrinkles, let it warm up in the sun for a while and it will soften and return to its proper shape.
4. Tips for a Perfect Mat Fit
If the mat is folded when you take it out of the package, leave it flat for a few hours. Pressing something light (like a blanket or a light box) on top will help it straighten out. But don’t put anything too heavy on it, as this can distort the edges of the mat.
Check everything after installation. A properly installed mat will not move and will fit tightly to the shape of the floor. If any corner feels high, don’t just press that area, lift the entire mat and reinstall it.
5. Safety Check After Installation
Be sure to do a quick safety check before driving. Check the brake and accelerator pedals fully, making sure they are not touching or obstructing the mat. Hold the mat by hand and pull lightly to see if it slips. If it does, it may not be clipped properly, or the mat may not be shaped right. Fix the problem right away.
6. Mat cleaning and maintenance rules
All-weather mats: Usually clean with water. If there is mud or dirt, clean it on the same day, if it dries and hardens, it will be difficult to clean.
Carpet mats: Regular vacuuming is the most important. Do not rub if there are stains, but rub it lightly. After cleaning the mat, dry it completely and then put it back in the car, otherwise it may smell.
When to replace the mat: If the mat becomes too thin, torn or permanently deformed, buy a new mat immediately. Bad mats can slip and pose a safety risk.
7. Some common problems and solutions
The mat slips: This means that either the clips or anchor points are not attached properly, or the mat is not correct for the car model. The solution is to remove the mat and reinstall it. Sometimes a slight misalignment is responsible for slipping.
Mats are wrinkled: A little heat will fix it. Leave them in the sun for a while, or place them in a warm place indoors. The mats will soften and return to their original shape.
Clips won’t hold: Check to see if you’ve installed the driver and passenger side mats upside down. This is a common mistake.
Final Verdict
Installing the mats on the Rivian R1S is a small task, but if done correctly, it keeps the interior of the car clean and protects the floor from scratches. In my experience, properly installed mats keep the cabin cleaner, the floor better, and the mats themselves last longer. Just a few minutes of care can make your car’s interior look neater and more ready for any use.